ASP.NET Core 应用程序剖析
早对 .NET Core 有耳闻,最近才有时间学习和接触,而 ASP.NET Core 作为 .NET Core 中的一部分,可以在 Windows、Mac 和 Linux 上开发和运行可跨平台的 Web 应用程序。ASP.NET Core 是对 ASP.NET 的一次意义重大的重构,由于架构上的改变,它不再基于 System.Web.dll ,它成为了一个更精简并却模块化的,可运行于 .NET Core 和完整的 .NET Framework 之上的框架。
微软官方的快速上手教程:Get started with .NET in 10 minutes ,其中包含 .NET Core SDK 的下载地址。
安装完成后,可通过命令提示符查看版本和帮助
// 查看版本
dotnet --version

// 查看帮助
dotnet --help

// 查看初始化项目帮助和框架中包含的模板包
dotnet new --help
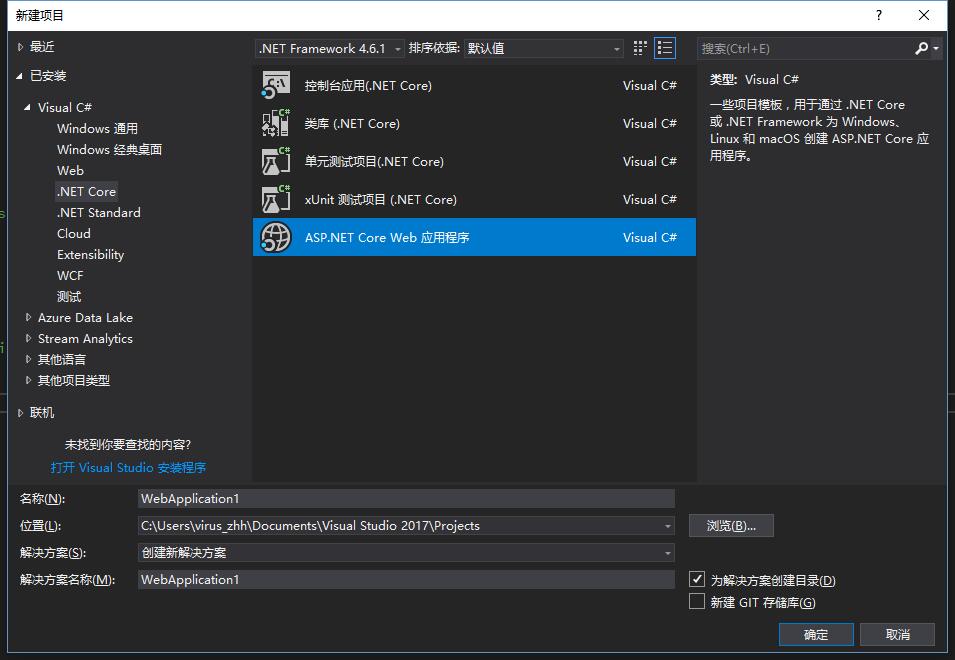
如果使用 Visual Studio 2017.3 预览及以上版本,可以快速体验开发环境的搭建。
1.创建一个简单的 ASP.NET Core 应用程序

查看生成的项目包含两个类文件 Program.cs 和 Startup.cs
Program.cs
public class Program
{
    public static void Main(string[] args)
    {
        BuildWebHost(args).Run();
    }

    public static IWebHost BuildWebHost(string[] args) =>
        WebHost.CreateDefaultBuilder(args)
            .UseStartup<Startup>()
            .Build();
}
看到这个静态的 Main 函数,我想起了人生中的第一个 C# 程序 「Hello World!」 ,这里,就是程序的入口!
2.宿主程序的初始化
这里通过 BuildWebHost 方法创建了一个 Web 应用程序宿主,而宿主初始化是通过 CreateDefaultBuilder 来完成的。
CreateDefaultBuilder(string[] args)
public static IWebHostBuilder CreateDefaultBuilder(string[] args)
{
    var builder = new WebHostBuilder()
        .UseKestrel()
        .UseContentRoot(Directory.GetCurrentDirectory())
        .ConfigureAppConfiguration((hostingContext, config) =>
        {
            var env = hostingContext.HostingEnvironment;

            config.AddJsonFile("appsettings.json", optional: true, reloadOnChange: true)
                  .AddJsonFile($"appsettings.{env.EnvironmentName}.json", optional: true, reloadOnChange: true);

            if (env.IsDevelopment())
            {
                var appAssembly = Assembly.Load(new AssemblyName(env.ApplicationName));
                if (appAssembly != null)
                {
                    config.AddUserSecrets(appAssembly, optional: true);
                }
            }

            config.AddEnvironmentVariables();

            if (args != null)
            {
                config.AddCommandLine(args);
            }
        })
        .ConfigureLogging((hostingContext, logging) =>
        {
            logging.AddConfiguration(hostingContext.Configuration.GetSection("Logging"));
            logging.AddConsole();
            logging.AddDebug();
        })
        .UseIISIntegration()
        .UseDefaultServiceProvider((context, options) =>
        {
            options.ValidateScopes = context.HostingEnvironment.IsDevelopment();
        });

    return builder;
}
其中有些代码貌似在 ASP.NET Core 1.0+ 中见过...
- .UseKestrel():使用 KetrelServer 作为 Web 应用程序的 http 服务器,是一个具有跨平台特质的服务器
- .UseContentRoot(Directory.GetCurrentDirectory()):使用配置应用程序根目录作为 Web Server 内容根目录
- .ConfigureAppConfiguration(...):读取配置文件 appsettings.json ,添加用户敏感数据、环境变量和命令行参数
- .ConfigureLogging(...):读取配置文件中的Logging节点,配置日志系统
- .UseIISIntegration():使用 IIS Express 作为 http 服务器的反向代理服务器,用户开发时 Debug 使用,发布于正式环境时可以选择 iis 、apache、nginx 等等
- .UseDefaultServiceProvider(...):设置默认的依赖注入容器。
3.宿主服务和请求管道的配置
返回 WebHostBuilder 回到 Program.cs ,通过 UseStartup 调用 Startup 类进一步定义请求处理管道和配置应用需要的服务。
CreateDefaultBuilder(string[] args)
public class Startup
{
    public void ConfigureServices(IServiceCollection services)
    {
    }

    public void Configure(IApplicationBuilder app, IHostingEnvironment env)
    {
        if (env.IsDevelopment())
        {
            app.UseDeveloperExceptionPage();
        }
        app.Run(async (context) =>
        {
            await context.Response.WriteAsync("Hello World!");
        });
    }
}
- ConfigureServices:配置应用程序中所使用的服务,将其添加到依赖注入容器中。例如 ASP.NET MVC Core framework、Entity Framework Core、Identity 等等
- Configure:配置HTTP请求管道,类似 ASP.NET 中的 HttpHandler 和 HttpModule,一般用来配置中间件(middleware)
4.创建宿主
之后,通过 Build 创建宿主,然后 Run.
- 本文链接 : https://www.zdyla.com/post/aspnet-core-project-parsing.html
- 版权声明 : 本博客所有文章和照片除特别声明外,转载请联系作者获取授权,并请注明出处!